
 View Cart {{shoppingcart.totalQuantityDisplay}} Item(s)
View Cart {{shoppingcart.totalQuantityDisplay}} Item(s)
View Cart {{shoppingcart.totalQuantityDisplay}} Item(s)
Carpet Installation Guides

Carpeting Your Pontoon Boat
Before installing your new boat carpet its a good idea to roll out and lay the new carpeting out in the sun for a while to allow it to become more pliable. This will also help let some of the wrinkles out. About 15 - 20 minutes should be good.
If at all possible try to install your new carpeting in such a way that no seams will be needed. If seams are absolutely necessary, then make sure when you but up the two ends that the carpet's pile run in the same direction. This will help make the carpet look seamless.
Un-Bolt all fencing and furnature. Remove all this from the deck of the boat and place it in the same configuration on the ground beside the pontoon boat. This will help you remember where everything went on the deck of the boat before it was removed.
Remove old carpeting.
After old carpeting is removed you will be left with a deck full of old carpet glue. You will want to try and romove most of this old glue to ensure a good tight bond for the new carpet. This will also smooth out the high and low points on the deck caused by the old glue that would make your new carpet look level with no lumpy areas. Use a medium grade sand paper possibly on a belt sander. Be sure not to sand too far into the deck boards.
Once your deck is cleared and clean you are ready to install your new boat carpeting. MAKE SURE that the glue you have chosen is a water based waterproof marine grade adhesive made for this type of application. Be thorough and spread the glue over only a SMALL area at a time as the marine glue will dry to quickly to do the entire deck of the boat at once.
Start to glue down your carpet from one end of the boat to the opposite end. Spreading small areas of glue as you go along. Also smooth out the carpet as you go along. Generally one gallon of marine grade adhesive will cover 90 square feet, or 10 square yards. (9 SQ/FT = 1 SQ/YD)
After carpeting the entire deck take a rolling pin or a piece of pvc pipe and roll it over the new carpet to smooth everything out and ensure proper adhesion to the deck in all areas.
After smoothing out your new carpet cut off any excess that might be left.
Let the new carpeting dry to the deck of the boat preferably overnight. 12-24 hours would be best before you start to place the furniture and fencing back on to the deck of the pontoon.
Your project is now complete! At this point put your pontoon back into the water, grab a cooler full of beer, relax and enjoy the rest of your day out on the water.
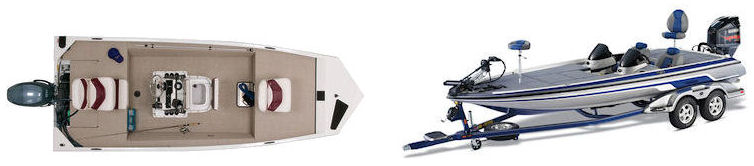
Carpeting Your Bass Boat
First, remove all your storage compartment lids and hardware. Make sure you get the old marine glue off.
After scraping the old glue off everywhere the bass boat was carpeted, take your drill with the stripping wheel and go over the areas that had glue on it. The cleaner the surface the better. Vacuum and wipe the areas down.
Next, measure and cut the boat carpet, start with the bass boat deck first. Take a rough measurement; make sure you allow more than enough carpet, so you can trim it. Make sure your grain is going in the right direction. Work on one section at a time. We found it best to use a roller or paint brush and apply the glue to the boat deck and lay the carpet on top: it helps to have another person to help you with this.
Situate the carpet where you want it, and then start pressing and rubbing the carpet down, from the center to the edges. Let the excess carpet over hang the edges for now.
Press the boat carpet to the edges where you want to trim it. Take a phillips screwdriver and run it along the edge, with pressure, where the trim cut will be. You will notice the screwdriver will make a line on the edge. This is where you will cut it. It's good to use a sharp knife or pair of scissors, always measure twice and cut once!
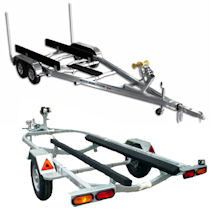
Below are step by step instructions to help you re-carpet your boat trailer bunk boards.
Please read the special notes at the bottom to answer any other questions you may have.
If the below does not help you please feel free to give us a call and we will be more than happy to assist you.
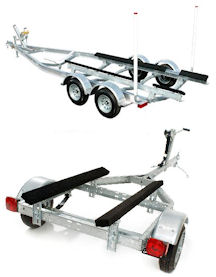
How to replace your trailer Bunk Board Carpet
Unbolt and remove existing bunk boards from trailer. Take the existing bunk carpet off and sand away any glue or debris before applying new carpet. Also examine the old bunk boards and make sure that they are not warped or broken. Replace if needed. Obviously skip this one if your starting with new bunk boards.
Measure the size of your boat bunks to determine how many rolls of bunk carpet you will need. (See "Note" at bottom for suggested measuring method)
You may either glue or staple your replacement bunk carpeting down. We would suggest just to staple your new bunk carpeting. This will allow the carpet to give a little while loading and un-loading your boat and prevent tearing of the carpet over time.
Before carpeting your trailer bunks take the bolts used to secure your bunks to your trailer and insert them into your already drilled out holes on your bunk board. Follow the steps below with the bolts inserted through the drilled out holes on the board. This will allow the carpet to be applied over the head of the bolt preventing it from scratching the bottom of your boat or pontoons.
Unroll and layout your new carpet (which you have already cut to size) with the rubber backing facing up. Place the bunk board evenly right to the edge of the laid out carpet. Leaving enough carpet on either end to completely wrap each end of your bunk. Hold the carpet to the board and start to roll the new carpet onto the bunk board. Staple down the first side. Then roll the board until it is completely covered. When you get to this point take a staple gun and apply staples every 2 to 3 inches along the bottom of the bunk board. This will ensure a secure and snug fit. If measured correctly when cut there should be about 2 inches or so of carpet left to overlap the first initial bottom side, staple down this excess carpet on top of the existing carpet.
(If you plan to use marine carpet glue please be sure to use water based carpet glue, other alcohol based adhesives will eat away the rubber backing of the carpet.)
Take the newly wrapped bunk board and place it with the bottom side up one last time and use the excess carpet you have already accounted for at either end and wrap, securing with glue or staples. Overlap and secure the excess carpet to the bottom side of the bunk.
Place your new bunk board off to the side and repeat steps for remaining bunks.
NOTE:
For a better look, plan to wrap the entire bunk board, ends too. The majority of trailer bunks are made using standard 2x4 or 2x6 boards.
The actual measurements of a (in inches):
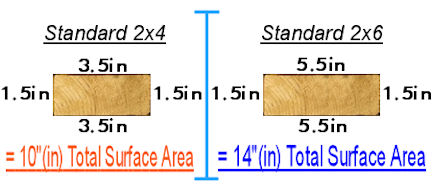
For bunk carpet installation: The width of the replacement carpet for each bunk should be at least 12 inches wide for 2x4 bunks (16 inches wide for 2x6 bunks). This allows an extra 2 inches of carpet to overlap on the bottom of the bunk which lets you easily secure the carpet around the bunk. When measuring the length of each bunk board add an extra 7 inches to the total length, to be safe. This allows for an extra 3.5 inches of carpet for both ends of the bunk. 1.5 inches of that is used to cover the exposed wood at either end. The other 2 inches is overlap so that you my secure the carpet easily at both ends with a staple gun and/or glue.
**Special Note**
For those who have bunk boards that use 2x6 size boards. Our 16oz. rolls of marine carpet can be used because the 12in wide rolls of bunk carpet are not wide enough to fully cover the 2x6 application. For a 2x6 application you will need your replacement carpet to be about 16in wide per bunk to be safe. These rolls of our 16oz marine grade carpet can be taken and cut into 16in wide strips.
There are 6ft wide and 8.5ft wide rolls available.
- A 6ft (72in) wide roll will allow you to cut 4 16in wide strips.
- A 8.5ft (102in) wide roll will allow you to cut 6 16in wide strips.
***As an added bonus there are 15 different colors of our 16oz carpet available and in stock to choose from. In some cases purchasing a full roll of 16oz or 20oz carpet and cutting it into strips for your bunks may be cheaper than purchasing multiple pre-cut rolls of bunk carpet. There is no difference in quality between our pre-cut bunk carpet rolls and our full rolls of marine carpet. All of our carpet is tough, durable, fade resistant, rubber backed and made specifically for use in the harsh marine environment. Click HERE to be taken to our 16oz marine carpet color choices. If you are in question about which style and size carpet would be best for your application please feel free to call us and we will be happy to help you find the correct carpet for your application at the cheapest price. Contact us toll free at 866-237-0075.